The Wimp Development System for Risc OS | ||
The Wimp Development System for Risc OS | ||
Download the resource |
One of the many new features of RISC OS 4 is its inbuilt support for screensavers. On previous versions of RISC OS the user has had to deal with keeping a tab on whether or not a screensaver should be called. All this hard work is now done by the operating system, leaving the programmer with the job of writing the actual screensaver itself.
As a Wimpbasic (WB) enthusiast I thought it would prove an interesting project to write a screensaver that can also be set up as a screenlock. The screenlock aspect will not keep out a real hacker but should be sufficient to prevent the casual user from seeing any private data, and also stop the children from helping with the home accounts!
I should point out that this is not competition for Ray and his excellent Dr Wimp series, but an attempt to show that for those who want to write desktop applications there is an alternative that hides (even more) the workings of the wimp from the user. In developing Wimpbasic applications I have actually learnt a lot about the wimp.
Over the next three issues we will be creating a screensaver come screenlock program. This first article deals with the creation of the windows for the screen saver setup program. Next month we will go through the design of the code and then in the third article we will concentrate on the screensaver itself. The design of the windows and the code has been broken down into two articles as Paul, for some reason, didn't want a 32 page WB special!
Wimpbasic is an attempt to provide a fully integrated developement enviroment for the RISC OS world. The programmer designs the windows and code all from within the same software tool, it is probably the nearest tool to Microsoft Visual Basic that we have. The only difference being it produces compact software that is easy to develope. Clares advertise the software as being suitable for small, simple applications. However, I have felt that this rather undersells the product, as it is certainly capable of doing more. Wimpbasic is supplied by Clares Micro Supplies for the remarkable price of £60.
A mini review of Wimpbasic by Peter Bond can be found in Archive10.7 p36. A getting started article and more detailed review can be found in Archive 10.8 p53.
All of the resource files and compiled applications can be found on the monthly disc. For those without Wimpbasic I have supplied template files and text files of the code. The files can also be found on my website, follow the links into the Wimpbasic area and tutorials. The address is at the end of this article.
Enough of the waffle! Let's get our hands dirty, and produce something. However, I would suggest that if you haven't used WB for a while or are new to the software that you run through the first two tutorials supplied with the software.
The software that we will call the "Archive Screensaver" comes in two parts. The program that sets up the user defined elements called Saversetup, and the actual screensaver. I have decided to create the Saver Setup program first, as it shares some code with the main program, and means a detailed explanation can be given in the next, shorter article. This program is also simpler in design.
Create a directory for the project, and using your favourite text editor create an obey file with the command :
filer_opendir ADFS::HardDisc4.$.!Boot.RO400Hook.Res.Configure.ScrSavers
and save it as open in your directory. This opens the directory where the screensavers are ultimately installed.
You can also create another obey file called choices which will open the screensavers choices directory :
filer_opendir ADFS::HardDisc4.$.!Boot.Choices.ScrSavers
Obviously this will only work if your harddisc is called Harddisc4 and is on ADFS. You should amend the path prior to !Boot accordingly.
Both of these will be useful for debugging and later installing the finished applications. I have specified the actual paths rather than those set up in the system variables, in case the paths have not been set up or have been altered by the user. The case does not really matter.
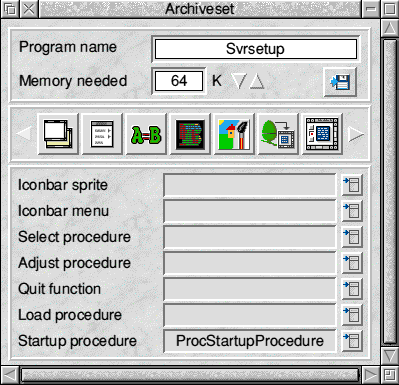
In Wimpbasic create a new project called saverset. In the main window give the software the title svrsetup. Make sure the spelling is as shown. This becomes the application enviroment variable (svrset$Dir) when we compile the application. See Below.
To start with we will create the windows required so go to the window editor and create a new window. From the menu select window data, title the window Archive Choices. This is the title that will appear on the windows titlebar. Click Ok to close the data window.
In your newly created window create a raised border and call it boundary$. From the options set the button type to ignore and unset filled. Click Ok.
Create an option button and call it lock$. In the text field put Password Protect. Unset the filled button and click Ok. The reason for unsetting the filled button is two allow the shaded background to apear around the text. If you leave it set the text appears on a plain grey panel. Play around to see what I mean.
You now need to create a text slabbed button (or text icon). This is the raised button in the botton left of the Select border window. Call it change$, tick the shaded option and amend the text to Change. Click Ok to finish the icon.
Create a second raised border and call it boundary2$. Give it the same attributes as the previous border. Create a raised slabbed icon (top right in the select border and call it slab$. Select the icon and choose modify from the menu. Set the text to graphics and button type to ignore. Place it so that it is sat over the raised border.
Create a radio button and call r1$. Unset the filled option and set the ESG group to 1. Click Ok. Set the text to Stationary. Now copy the button and alter the text to Moving.
Create a further slabbed button and call it cancel$, and position it on the left hand side of the window. Finally create an action button (the one with the sunken yellow border), call it set$ and enter the text as Save Choices.
All that remains to be done is to resize the window, to a suitable size (ie as small as possible) and remove all window furniture apart from the title bar and back icon. Keep the option to have the window moveable ticked.
With a bit of luck the window should look something like the one below. You can now test and play with the window, to get it just right. Save the window as main.
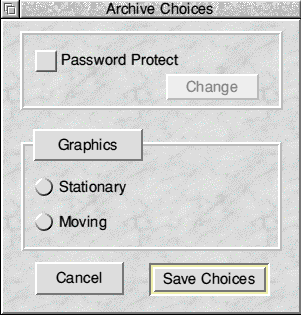
Figure 1 The main program window
The saversetup program needs a 2nd window, which will allow the user to change the password, so create another window.
In your new window create 3 icons, with no border, and unfilled, with the following text entries, Old Password, New Password, New password (yes it is duplicated), and align the text to the left of the window. In the modify icon window set the button type to ignore.
Create 3 writeable icons, and call them old$,input1$,input2$ and align them to the 3 text icons previously created. Using adjust select the 3 writeable icons and from the menu, click on Amend Select. In the field pointer enter ptr_write. Make sure that this is typed in as shown. In the 'other' field enter D*;KR.
This needs a bit of further explanation. The D* instructs the wimp to replace any user input with an asterisk. You can of course choose any replacement character that you wish with the exception of ~/-/;/ \ (back slash). The part after the semi colon simply tells the wimp to move to the next writeable icon if return is pressed. These codes are standard wimp codes and not specific to WB. It is important though to put the D* first as it won't work the other way around. For those interested pages 102-103 of volume 3 of the PRM will give further guidance.
Finally you need to create two further buttons. One will be a slabbed button with cancel, the other the action button with Change Password. The buttons should be named cancel$ and change$ respectively.
Having laid out the window, see below, you now need to go and amend the window data. For this window you need to remove all furniture except the titlebar, and make it immobile. The reason for making the window a fixed window with no way of clearing is to force the user to either change the password or close the window, under our control. This enables us to set flags later on if the user decides not to change the password.
Save the window as newpass.
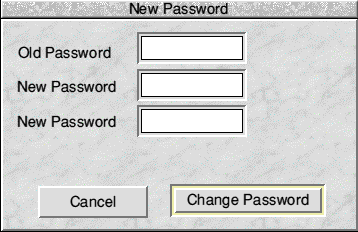
Figure 2 The password window
Try testing the window. When you type anything into the one of the three icons you should get asterisks displaying rather than the text that you type. If, on pressing return in the first two fields the caret does not move to the next one then check that you have put a semi colon in the other field between the asterisk and the KR.
The article is quite lengthy and wordy, however it is much simpler to do. For the next installment ensure that the two windows you have created are similar to mine and effectively working. Ensure that buttons and writeable fields have the correct name, as these will be referenced next time in the actual code.
For those of you interested, the full source file is enclosed on the monthly disc, along with a few other bits and pieces. You can obtain the files from my website, the address of which is detailed below.
Well thats it for this round. Next time we will create the code to handle these windows, before moving onto the screensaver proper.
If you have any queries or comments let me know, by email or via Paul. jpeachey@argonet.co.uk