Note that the details in this Application note refer to the CoverMaster® CM52 cover meter (and which also apply to the CM5 and CM42).The principles as outlined also apply to the CM9:
display of signal strength is obtained by holding down thesymbol while switching on.
Usually, cover measurements are made to reinforcement consisting of bars which are assumed to extend beyond the ends of the search head, ie they are assumed to be of essentially infinite length.
For the most accurate measurements (for example, when performing a calibration check) the bar should be of at least 500mm length with the head over its centre, ie the centre of the head should be at least 250mm from the ends of the bar. In practice on site, the accuracy of the CM52 when measuring cover is not noticeably affected until the centre of the head is within 100mm of the end of the bar.
However, there will be situations where concrete beams are being investigated, both pre-cast and in-situ, when an engineer may wish to investigate the reinforcement right up to the end of the beams, locate the ends of the bars, and possibly even make measurements from the end face of the beam.
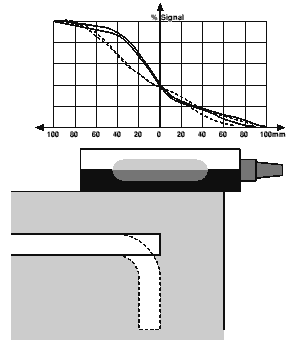
If the head of the CM52 is placed over a bar, the MODE switch set to CALib (so that signal strength is displayed instead of cover), and the head scanned lengthways towards the end of the bar, it will be found that over the last 100mm of the bar, the signal strength decreases systematically to about half, and with further movement beyond the end of the bar, the signal continues to decrease and virtually disappears within about a further 100mm.
| Figure 1 shows graphs of signal strength as a percentage of maximum versus position with respect to the end of a bar.
The solid curves refer to a bar with a square-cut end, and are for two covers of 30 and 60mm, which are seen to be essentially the same as each other.
The dotted curves are at the same two covers and refer to a bar whose end is bent away from the concrete surface; these two curves are similar to each other although noticeably different to the solid curves in the region between 10 and 60mm from the end of the bars.
All four curves are close to each other near the centre of the graph: exactly at the bar ends, the signal strength lies between 37% and 41% of maximum in all four cases; and the signal strength is seen to pass through 38% of maximum within ±2mm of the bars' end in all four cases. |
 Figure 1 |
If the CM52 had been set to display cover, the results are less easy to interpret. In the situation above, when the centre of the head was exactly over the end of a bar, the 30mm-covered bars indicated a cover of 41mm, ie +11mm or +37%, while the 60mm-covered bars indicated a cover of 73 or 74mm, ie +13½mm or +22½%. This suggests that it may be possible to estimate the position of the end of a bar by noting the point at which the indicated cover has increased by about 12mm; but this is unlikely to be as reliable as the technique using signal-strengths as recommended above.
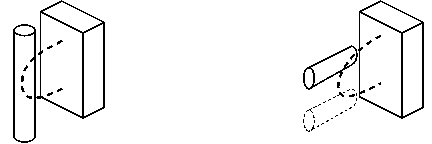
Figure 2 (left) shows how the magnetic field from the CM52 search head is optimised to respond to linear features whose axis runs parallel to the face of the search head and the surface of the concrete; and this is normally the situation.
However, if a rod-shaped object has its axis perpendicular to the concrete surface and head face, the head responds with two signal peaks when the rod is underneath either one of the two "hot spots" corresponding to the points where the magnetic field leaves and re-enters the active face of the search head (as mentioned in §5.10 in the CM5 and CM52 User Manuals); and this is illustrated in Figure 2 (right).

|
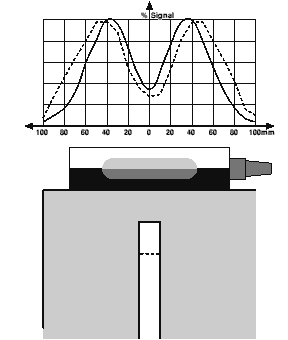
If a CM52, with MODE switch set to CALib as in the previous example, has its search head scanned lengthwise across the end of a square-cut bar, a traverse profile of the form shown in Figure 3 is obtained.
The solid curve is for a true "cover" of 30mm, and the dotted curve that for 60mm.
The two peaks are clearly seen, having a separation of 75 to 85mm corresponding to the 80mm distance between the two "hot spots" of the search head.
The absolute signal strengths at either peak however are a little less than 20% of the signal which would have been obtained under "normal" conditions. As a result , the cover displayed by the instrument bears no similarity to the true cover: the true cover of 30mm was indicated as 49mm (ie +19mm or +63%), and the true cover of 60mm was indicated as 87mm (ie +27mm or +45%). |
 Figure 3 |
Determination of cover is less easy to achieve: as stated above, the abnormally-low signal strengths from a bar in the "wrong" orientation prevent the true cover from being displayed directly.
However, three possibilities for deriving the cover can be suggested:
Estimation of cover from the end of a beam to the end of a bar:
(1) If end-on measurements are required on a regular basis, it would be appropriate for the user to prepare calibration/conversion graphs or tables.
It is not necessary to prepare specimens cast in concrete for this; merely to use spacers (of wood or plastic) of known thickness between the face of the search head and the end of a sample of bar.
The actual setting of the DIAM knob is immaterial, but the value should be recorded so that the site measurements are made using the same DIAM setting as that used to prepare the conversion graph.
(2) For medium and larger bar sizes, it is possible to use the DIAM knob to compensate for the reduced signal strength, by setting it to a value considerably smaller than the actual bar diameter.
Since the signal strength observed above was approximately one-fifth of that expected under "normal" conditions, it might be guessed that a DIAM setting of one-fifth of the bar diameter might be about correct; but it is necessary to confirm (or amend) this by experiment as in (1) above, and the actual test results listed below suggested that a factor of four seemed to yield better answers.
For example, the correct values (±1mm) for cover to the square-cut end of a T20 bar were displayed when the DIAM knob was set to 5, for a T25 bar when set to 6, for a T32 bar when set to 7, and for a T40 bar with the DIAM knob set to 12.
|
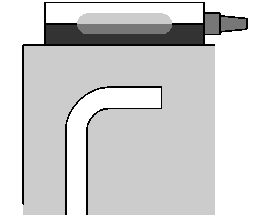
(3) Both the above two suggestions refer to measurements to a square-cut end; but it is also common practice to bend the ends of bars through 90°, in which case the last few centimetres of the bar will actually present themselves in the "normal" orientation to the CM52 search head (Figure 4). The end of the bent-over bar described on the first page presented a "length" of only about 70 to 75mm, which would normally be expected to be insufficient for accurate measurement; and indeed the signal strength received was only about 65% of that from a longer length. |
 Figure 4 |
It is also possible to apply the rationale of (2) above and reduce the DIAM setting to approximately two-thirds of the actual bar diameter. The bent-over bar just referred to was a T16 bar, and the correct values (±1mm) were displayed if the DIAM knob was set to 10 -- but it must be appreciated that if the residual length of the bar-end had been less than or greater than described, this technique would have either under- or over-compensated respectively, so it is unwise to expect to regularly achieve accuracies as good as ±1mm if the length of the bent portion is unknown.
![]() Return to Home Page . . . . . .
Back to "Technical Library" page
Return to Home Page . . . . . .
Back to "Technical Library" page
Page (HTML and images) Copyright © Protovale 1994,1999.