![[Home]](../iconz/home.gif)
Lecture notes for Imperial College ACT course:
NDT - "Electronic Covermeters"
John C Alldred MA MSc, Protovale Oxford Ltd.
1: Requirements to be met:
Requirement Solution
(a) merely detect presence of metal: Any metal detector-- to any depth
(b) locate re-bars: Devices available
(c) locate and estimate approx. depth: Devices available
(d) measure cover over bars of known size: Standard cover meter, as described here
(e) measure cover to bars of unknown size: Possible: varying accuracy
(f) measure diameter of bar: Never as accurate as claims
(g) locate non-ferrous re-bars: Use stainless walltie locator for the time being
(h) cover to non-ferrous bars: (Prototype stage only)
(i) estimate degree of corrosion: NOT with a cover meter alone.
2: Accuracy:
Relevant standard(s): original BS4408:Part1:1969 rewritten as BS1881:Part204:1988: "Recommendations on the use of electromagnetic covermeters". In these we find references to three different accuracy levels, here referred to as L1 to L3:
L1: ±2mm or ±5%: required under ideal laboratory conditions;
L2: ±3mm (8%) (earlier draft only): desirable target for on-site use;
L3: ±5mm or 15%: upper limit for on-site use.
Unfortunately, no criteria are given to define "on-site" realistically.
3: Magnetic Reluctance technique:
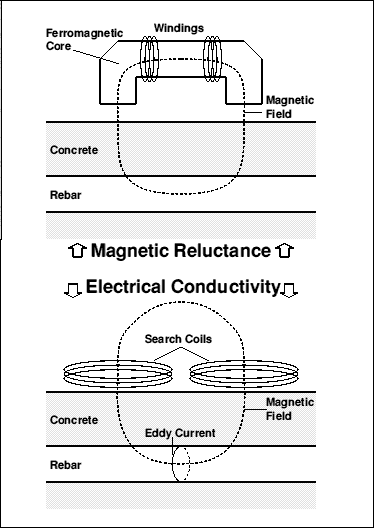
"The Covermeter" was first developed in 1955 at the (then) C&CA; the principle then remained virtually unchanged for nearly thirty years, and is still found in use today. See Figure 1a.
A U-shaped iron core is energised by low-frequency AC in one winding, and the signal coupled to a second winding is monitored. A nearby re-bar affects the magnetic path (cf the "keeper" of a horseshoe magnet), and increases the signal. The signal is a maximum when the head is aligned with the bar, increasing slowly with bar size and decreasing rapidly with distance (cover). As it is really a measurement of small changes in the characteristics of the core (signal is continuously present and only increases slightly with bar presence), it is strongly affected by variations in the core due to eg temperature changes and external magnetic fields (even the earth's field), and also by magnetic aggregates in concrete.
4: Electrical Conductivity technique:
A magnetic field (of similar shape to that above) is generated, of higher frequency and using air-cored coils. This induces "eddy-currents" to flow round the circumference of the bar which produce a signal in the head (Figure 1b). Pulse techniques separate the received signal from the transmitted one, so there is no signal in the absence of a bar. This is the stablest technique. As always, signal increases with bar size and decreases with depth of cover.
Other techniques are also used, with principles intermediate between the two described above.
5: Bar location practice:
5.1: Single bars:
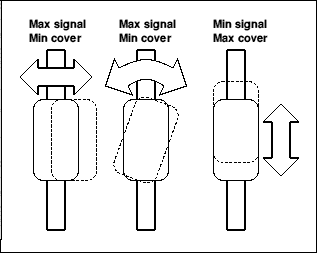
See Figure 2. The (directional) head is aligned parallel to the expected run of the bar, and position optimised such that there is:
(a) maximum signal (minimum cover) with respect to sideways movement,
(b) maximum signal (minimum cover) with respect to head rotation,
(c) minimum signal (maximum cover) with respect to lengthways movement.
Note that (c) is necessary to minimise and/or recognise effects of transverse bars, lapped bars, tie-wires etc (see §§6.2 and 9 later), but regrettably is often forgotten by the inexperienced!
5.2: Multiple (crossing) bars:
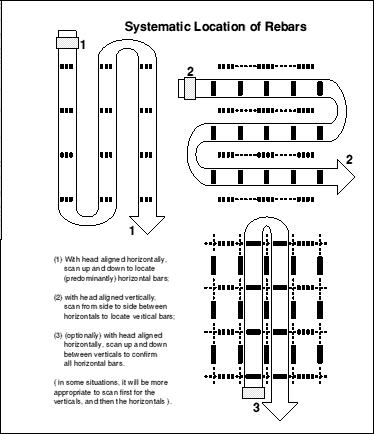
Alignment of the directional head is again the key (see Figure 3):
(a) make an informed guess of the reinforcement structure: if the two layers are of similar size, look for the nearer layer first; if of quite different size, look for the main (larger) bars first.
(b) Align the head parallel to the chosen bars, and scan sideways for maxima as you cross each bar (and mark them).
(c) Rotate the head 90° and again scan the head sideways between the bars just found at (b).
(d) (Optionally) repeat (b), but keeping head between the bars found at (c).
6: Measurement of cover
should only be attempted when the head is:
(a) exactly over a bar,
(b) exactly parallel to the bar,
(c) not to close to any neighbouring parallel bars,
(d) not over, nor near, any transverse bars.
6.1: Adjacent parallel bars:
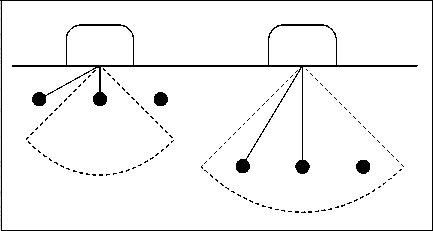 Signal decreases, not only with distance from the head, but also with angular displacement off its centre-line: consider the head to have a "field of view" (Figure 4).
The rule of thumb is that the centres-pitch of the bars should exceed 1½ times the cover for bars to be resolved and for cover to be accurate (note: about 1½, not exactly 1.500!)
This in turn means that claims to measure cover in excess of about 100mm will rarely be achieved in practice (because of insufficient bar spacing), claims in excess of 200mm never achievable, and claims in excess of 300mm not worth commenting on!
6.2: Neighbouring transverse bars:
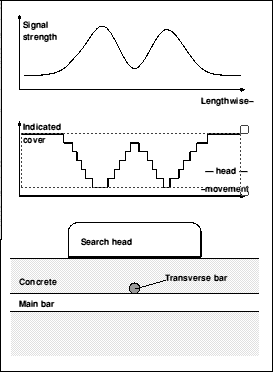
Minimum necessary pitch-to-depth ratio is typically greater than the 1½:1 of §6.1 above due to finite head length. Generally, the head should be positioned midway between two transverse bars; but if they are too close, it may be better to position the head directly over one (as opposed to partly-over two!):- see Figure 5 to explain rule 5.1c earlier.
Note: if the head is not directional, all the practices from §5.2 onward become much more difficult.
7: Welded mesh:
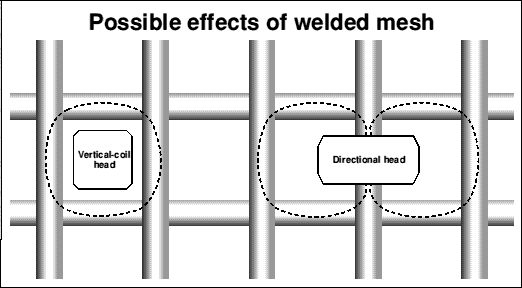 Everything about crossing bars applies, but if they are also electrically connected at crossing points, other things may happen due to currents flowing around rectangular "picture frames" (see Figure 6):
(a) purely magnetic (old) instruments are only slightly affected, but newer ones with any response to conductivity give an extra signal:
(b) non-directional heads also signal in the centre of the "frame";
(c) directional heads give a signal on the edge of each "frame" when the head is at right-angles to the bar (but not in the centre of a "frame").
8: Unknown bar size:
Everything so far assumes that the bar diameter is known (to ±1 bar-size).
There exists an established method (comparing indicated covers with and without a spacer between head and concrete) which can estimate diameter and cover of an unknown bar, but not particularly unambiguously; and a newer spacer method, using ratios of signals rather than differences in cover, which is more precise.
With care, good results for cover to a bar of unknown size can be obtained, but estimate of diameter is so influenced by neighbouring bars that it is never as good as armchair-engineers and other pundits claim.
Bar-sizing can be a manual paper-and-pencil exercise; or the instrument may automate it for you, giving you the same wrong answer but much more quickly.
9: Lapped bars:
These give a larger signal than a single bar, so cover is underestimated. Lengthwise scanning as in 5.1c will identify them; to measure cover, assume a diameter twice that of a single bar.
10: Various head designs:
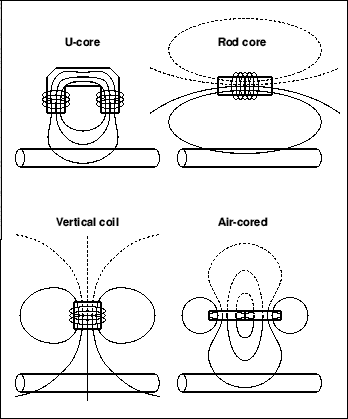 These are often offered in two different sizes. Some known designs are shown in Figure 7:
(a) U-core, as in §3: old style, well-controlled field distribution, directional, very poor stability.
(b) rod-core: directional; compact head size but field strays all over the place giving very poor performance even at moderate levels of bar congestion; core degrades stability.
(c) vertical coil: miniature versions give very good pinpointing; non-directional so cannot distinguish between vertical and horizontal bars, further degraded by welded mesh; drift observed although the cause is not obvious.
(d) air-cored (as in §4): well-controlled field distribution (though duplicated at rear of head), directional, no core so no drift, usable on welded mesh.
11: Various instrument styles:
All are battery-powered and portable. Wide variations in ease of use (up a ladder as opposed to on the lab bench). Early instruments had an analogue meter (reading from right to left), and no audible output. Latest instruments have digital display, which is clearer for reading cover but no use for bar location-- you must have an analogue indicator or signal-strength-related sound output for this.
12: Non-ferrous metals:
Stainless steel, being non-magnetic, is completely undetectable by magnetic reluctance techniques, but it may give some signal on an instrument responding to electrical conductivity. Since stainless steel is also a very poor electrical conductor, signal strength varies rapidly with bar size: the smaller sizes (8 and 10mm) are virtually undetectable; larger sizes (20mm and up) may be detected, but cover will always be overestimated. Locators for stainless-steel are available, but not (yet!) true covermeters.
Note that epoxy-coated (high-tensile) bar is detected quite normally.
13: State of corrosion:
This can not be inferred using only a covermeter-- a bar would have to lose well over half its bulk before a covermeter would notice! (Half-cell potential and concrete-resistivity surveys are used to estimate the rate of electrochemical activity going on; and these need to be interpreted by tying their results in with bar positions as determined by a covermeter survey, so a covermeter still plays a part).
14: Commercially-available models, alphabetically by manufacturer:
(a) CNS: Fe-Depth meter (analogue) and later Digicover (digital): magnetic reluctance method (Ucore), no audio.
(b) Hilti: Ferroscan: multiple sensors in wheeled head, to give graphical image for core-drillers.
(c) Kolectric: Mk 6 analogue magnetic (as above); Microcovermeter: electromagnetic, rod-cored, digital, small head necessary for close bars, automated bar-sizing, with audio.
(d) Proceq (Swiss): early models (up to Profometer 2) magnetic or electromagnetic, U- then rod- cores in large head, vertical coil in spot probe, analogue, no audio; Profometers 3/4: electromagnetic, vertical coil (both heads), digital, inaudible, bar-sizing requires extra attachment.
(e) Protovale: CoverMasters: electrical conductivity, air-cored, digital cover display, audio output; CM5/52: small head only required for shallow covers, analogue signal meter, manual bar-sizing, output for data-logger; CM9: fully-digital results, analogue audio, automatic bar-sizing.
All manufacturers' current models naturally claim conformity with BS1881 (§2) and do meet level L1 for a single bar in isolation. The actual effects of bar congestion (ie L2 or L3) need to be established by the user, as brochure claims are not directly comparable.
![[Home]](../iconz/home.gif) Return to Home Page
Return to Home Page
 Back to Technical Library: Papers
![[Reply]](../iconz/form.gif) Information request
Information request


 Signal decreases, not only with distance from the head, but also with angular displacement off its centre-line: consider the head to have a "field of view" (Figure 4).
 Everything about crossing bars applies, but if they are also electrically connected at crossing points, other things may happen due to currents flowing around rectangular "picture frames" (see Figure 6):
 These are often offered in two different sizes. Some known designs are shown in Figure 7: